Showing posts with label kids' crafts. Show all posts

Thursday, August 18, 2011

Coasters.

Inspired by the simplicity of this find on pinterest. (And the fact that I have all supplies on hand!) Abby & I made coasters. We had coasters, they're made of cardboard, which is a really stupid substance for a coaster to be made from, really.

This coaster is made from tile, paper, and felt, mod podge, and water-based sealer. Abby made a set and I made a set. She did everything herself, so it's a really easy project for kids to do!

Adaptations: I cut the paper a bit shorter than the size of the tile, so the paper didn't overlap. I also didn't have the little sticky felt pieces, so I just cut up some felt and glued it to the bottom. These are cute ideas for housewarmings, holidays, whatever. I think they'd also look cute with fabric scraps.

Tuesday, October 13, 2009

October 13. Leaf Projects.

Since we (I) collected so many leaves the other day during our walk through the park, I was trying to think of crafts to do with them.

I came up with the idea for a place mat (using clear contact paper),


and that then inspired a window decoration.


I really don't know how long they'll last (probably just the season), but they're pretty.

If we do it again next year, I'll probably trim the stems from the leaves since that kind of prevents the clear contact paper from bonding together. Also, overlapping the leaves isn't a good idea for the same reason.

Friday, August 21, 2009

Rose the Fairy.

We're still getting visits from Rose the Fairy in her daytime butterfly disguise. We say hello and wave. Often she waves back with her wings. I have to say, I'm thoroughly enjoying my second childhood.

Monday, August 17, 2009

Flower Power.

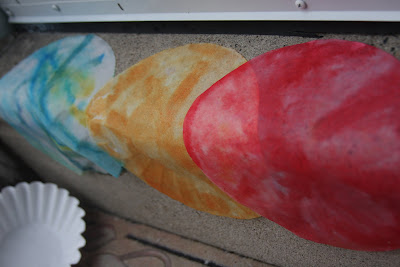
My mind is continually spinning thinking up different ideas for stuff to do with the child; it's quite the challenge, really. Today while making coffee, I decided it would be a good idea to do something with coffee filters. I mean, it's a pretty awesome craft supply because they're cheap and you can get 10,000 for like .40. Well, not really, but I'm feeling hyperbolic today.

So, we went outside in the horrific August-is-here-in-Philly-and-it's-kicking-everyone's-butt weather, and sprayed coffee filters with water. We then painted them with water colors and let them dry. It didn't take long in the heat. We then assembled flowers.


Fun craft. Playing with water outside. Sweat dripping down neck and back. Time to go inside to the air-conditioning.


To make the flowers:
1. Insert a pipe cleaner (I guess green would be the appropriate color since it's supposed to be a stem; but in our house, we get visits from fairies, so any color will do. We used pink.) in two just-off-center spots of the coffee filter. One side should be longer than the other. The shorter side should be about 1" or so.
2. Twist the small part of the pipe cleaner around the longer side a couple of times.

3. Gather the bit of the coffee filter that is attached to the pipe cleaner and wrap the pipe cleaner up a bit. (You're kind of making the stamen of the flower.) I know this sentence if completely unclear, but I'm not sure how else to word it!)


4. All finished!

Thursday, August 13, 2009

Fairy Cottage.

Yesterday as I was cleaning up breakfast, the child asks, "Now what?!" It was 9:30am. My mind quickly scans our usual non-TV activities: painting, coloring, drawing, matching games, candy land, gluing things to other things. These things usually last about 10 minutes (at most) each. *sigh*

I don't know where this thought came from, and oddly, it was coming out of my mouth even before my brain realized it was: "Let's make a fairy house!" And so we did. We went outside and collected twigs, pinecones, the spiny parts of the coneflowers, pieces of bark, and acorns. Inside, we gathered an old birdhouse (that oddly enough, I decorated with fairies a few years back), feathers, pompoms, glitter glue, paint, ribbon and beads. (The perk of being a crafty collector is that you have all this cool stuff laying around!)

I was surprised when the outside collection process lasted about 45 minutes. During this time we were wondering what color fairies like, and what they eat. I could not believe she was so into this!

As she started to paint the house, I burned the tips of my fingers off with the glue gun while applying twigs. She painted little rocks and I (more carefully) glued them on. She used the glitter glue to attach the pom poms and ribbon. This took just about an hour! A record!!!

We wrote a letter to the fairies. Happily, this morning we found a letter from a fairy named Rose. She thanked Abby for the beautiful cottage and asked her if she could move in some of her stuff. Rose also told us her friends' names: Lily, Daisy, Persephone & Violet.

We were suprised to find out that fairies disguise themselves as butterflies during the day! Who knew!? Yesterday we actually touched Rose's yellow & black wing as she was feeding on our butterfly bush. Rose commented that she liked it when we pet her.

Abby was very upset that the Rose & her friends didn't stay around for her to see her. We'll write her another letter tonight and hopefully she'll give us an explanation.

Tuesday, June 30, 2009

Freezer Paper Fun!

I bought freezer paper awhile ago. I bought fabric (screen printing) ink/paint even longer ago. A few weeks ago, 2 unflattering, shapeless t-shirts were purchased in shades of purple and pink (surprise, surprise.)

This morning after art class, I decided it was time to actually do something with these items. It was a lot of fun and I'm looking forward to doing more (flattering) shirts. Maybe even some for myself!
Abby just wanted to make a square so I used a tile. I made a stencil of one of those cheap wooden cut outs. It turned out really cool, but of course, since I can never leave anything alone, I had to exercise my 1980s puff-paint techniques. Why do I have puff paint? Well, I don't know. I just do. Accept it. I went a little too far with the puff paint, but it's good enough for a child's sleep shirt, no?

Monday, June 22, 2009

Father's Day!

First off, I have to apologize for the mish-mash organization of the photos...it's just not working out today, but I have faith that you'll be able to figure out what pics go with what. ;)

My husband is an amazing Daddy. He's patient, fun, tolerant, and loving. We had a wonderful day at a zoo preceded by breakfast and presents. (Abby decorated his chair with crepe paper.)
For breakfast, I adapted Paula Deen's french toast casserole. I made this once before, but followed the recipe. I like my version much better. Sorry, Paula! I decreased the fat a lot, and really, it could be decreased much more and still be delicious.

For dessert I made a simple, but much loved Fruit Pizza. Seriously, this is the easier recipe ever. It's not even really a recipe! A roll of Pillsbury sugar cookie dough, a small container of cool-whip (use fat-free for less guilt), 8 oz. cream cheese (I use 1/3 less fat) and mixed fruit of choice. I just used strawberries. Let the cookie dough and cream cheese come to room temperature, let the cool whip sit in the fridge so it's no longer frozen.
Shape the cookie dough into one big cookie and bake. Blend cream cheese & cool whip (oh, I add a bit of confectioner's sugar and vanilla). Once cookie cools, spread cream cheese/cool whip combo on cookie. Layer the fruit. The end.

Father's Day Gift:
I made a pillow with some a little swatch I purchased from Spoonflower. It's a drawing Abby did of "Daddy."


French Toast Casserole (adapted from Paula Deen)
1 loaf of Italian bread
4 large eggs
2 cups of fat-free half and half
1 tbsp sugar
1 tsp vanilla extract
1/2 tsp cinnamon
pinch of nutmeg
dash of salt
Praline topping (recipe follows)

Slice bread into 1-inch each. Arrange slices in 9 by 13-inch flat baking dish sprayed with Baker's Joy (or something similar). In a large bowl, combine the eggs, FF half-and-half, milk, sugar, vanilla, cinnamon, nutmeg and salt and beat. Pour mixture over the bread slices, making sure all are covered evenly with the milk-egg mixture. Spoon some of the mixture in between the slices. Cover with foil and refrigerate overnight.

The next day, preheat oven to 350 degrees F.

Spread Praline Topping evenly over the bread and bake for 40 minutes, until puffed and lightly golden. Serve with maple syrup.(I skip the maple syrup b/c it's sweet enough, IMO.)

Praline Topping
1 stick of butter (probably could use 1/2 stick)
1/2c packed brown sugar
2 tbsp light corn syrup
1/2 tsp cinnamon
pinch of nutmeg

Combine all ingredients & blend well.


Thursday, March 12, 2009

Painting: Part One.


Ever since watching this, I've been itching to paint, which is sort of weird since I haven't painted anything besides walls since college.

I have been fighting the urge to buy watercolors for a couple of reasons:
1. I don't really like water colors. I find the way they run annoying and the color saturation isn't strong enough for me. I'm more of an oil paint kind of girl.
2. Do I really need to spend more money of crafty things?

Rationalization of the two arguments:
1. You don't have your oil paints anymore (where'd they go, Dad?!), and watercolors are more preschooler-friendly.
3. Not really that expensive, at least not for the middle-of-the-road ones. Watercolor paper on sale for $1.50, water color set $4.99. SOLD!

OK, I'm getting ahead of myself. This blog is not about the watercolors, that's the "Part Two." Today is part one. My mom's birthday is coming up, and I prefer to give her handmade things, especially from Abby. We headed to Michael's in search of a terracotta pot and some paint. Got both, came home, and got to work. I had no intentions of painting my own pot, but couldn't resist the lure of the bold colors! I cleaned off a dirty terra cotta pot from my garage and got down to business.

True, I don't know when to say when, but oh well, it was fun!
(P.S. No picture of Abby's pot just in case Granma reads the blog!)